Pages

Friday, April 23, 2010

The Moon, Two Clear Nights

the Moon on 20 April 2010

the Moon on 19 April 2010

The sky has been clear most nights this week so I've taken the opportunity to stand outside staring at the moon! These two are from 19 / 20 April :-)

Thursday, April 22, 2010

Balloon Barrette Tutorial & Book Review


Before we get started with this post I wanted to invite you all to add a photo to our current "Shutter Love Tuesday" Link Party. The theme is "Balloons" Tomorrow we will be posting the TOP 10 Photos and 1 Viewer Choice. 
So get your photo entered soon! We need more entries. Thanks!

Now, Gather up some supplies for some fun new barrettes.  I found a wonderful book online. And as you already know, I am addicted to buying Craft books. Yes, I had to buy it!  

~Hair Bows for Kids~
A fun book that offers so many fun ways to make hair bows and barrettes out of things you wouldn't even think of. Some of the items she uses, is shoe laces, balloons, buttons, vinyl (yes I did write vinyl) and even food items. Too cute. You have to get this book. You can buy it HERE

Balloon Barrettes
Today I am going to share with you a tutorial about the balloon barrettes.

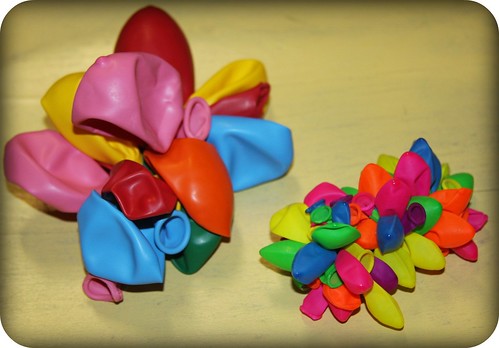
Aren't they cute! I can't wait to make various versions of these. I have so much in mind!


We'll start with the 
Large Balloon Barrette

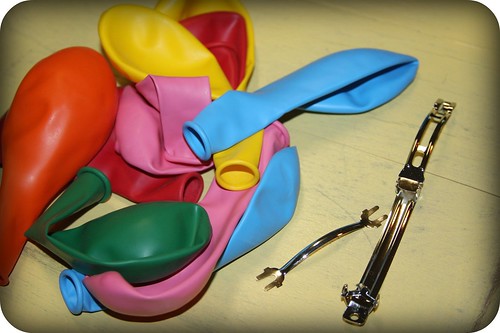
What you will need....
  • Large Balloons (about 10) in various colors
  • Large Barrette
How to make them...
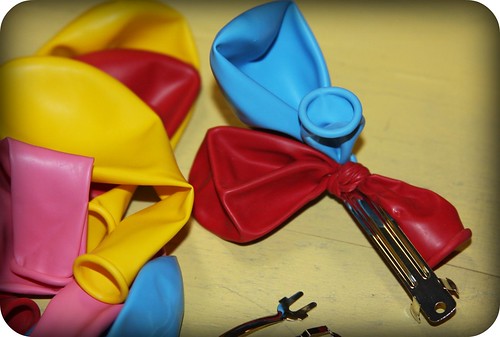
First, remove the back metal pieces from the barrette. Take one balloon (add just a bit of air) and tie it to the barrette. Continue tying the balloons on in alternate directions until you used all 10 balloons.

This is what the barrette should look like on the back. Keep the knots on the top side so it doesn't interfere with the barrettes metal back pieces. 
Place the two metal pieces back on the barrette. And that's it your done. It is that simple.
Look at how cute it looks in hair.
Small Balloon Barrette

What you will need...
  • Small Balloons (30) in various colors
  • Large Barrette
  • 6 1/8" ribbons cut to 6" each (any color will do, they aren't going to show.
How to make them...
Again, remove the back pieces off the barrette and set aside.  Start by taking 1 ribbon and tying 6 small balloons (filled with a bit of air) to the center. Continue making 6 clusters of these.
Now you have the finished clusters. It's time to add them to the barrette.
Double knot each cluster onto the barrette. Trim excess ribbons. You can always use a little glue to the knots also to keep them from coming undone. I did. 
Add on your barrette pieces and done. Another fun and easy balloon barrette.

I love this one because it has so many balloons. It just looks so cute.
Balloon Hair Clip

Fun Ideas for these....
  • Make them for the Birthday Girl
  • Give them as party favors at a birthday party
  • Add curling ribbons or netting for a special look
  • Make a variety of colors (rainbows or choose 2 or 3 colors
  • Make them all in one color and splatter with paint. These are in the book too! They are adorable.
  • Try adding 3 small balloon ribbon clusters to a clip for younger girls
  • They would make fun gifts too!
  • There is so much you can do with them. Have Fun!
While many reviews are created as a result of receiving a complimentary product, the following content was provided by Trendy Treehouse because it is a product that we believe in and purchase regularly. The item reviewed was  purchased on our own and was not compensated in any way for a review. Disclaimer/Terms of use.

Tuesday, April 20, 2010

Dandelion

dandelion, Taraxacum officinale

I'm sure the lawn will be more dandelions than grass before long. They're spreading like wildfire :-)

Monday, April 19, 2010

Shutter Love Tuesday


Come on by Trendy Treehouse Every Tuesday to enter your photos!

This linky party will be open for 48 hours. Then every Friday Jamie and I will share with you our favorite 
"10 Photos" 
Sound Fun! We think so!
Don't forget to grab the "Shutter Love" Button and place in your post to share with everyone, so they can enter their photos too! 
If sharing with other photo program, please leave a link back to Shutter Love Tuesday!

There will also be a prize for "Viewers Choice" So after you enter your photo, make sure you vote for your favorite by leaving a comment below. Please share why it's your favorite and PLEASE DO NOT VOTE FOR YOUR PHOTO. We know why you think it's fantastic. LOL 
Voting is open to everyone. You don't have to enter a photo to vote.
Remember to link to your photo, not your home page. Thanks!
Also please enter a photo taken by "YOU" only.

This weeks theme is "BALLOONS"
Be sure to check the sidebar for up coming themes! 


(one entry per person please)
Keep photos friendly for all ages please or your entry may be deleted. Thanks!

~ Tara's "Balloon" Photo ~
~ Jamie's "Balloon" Photo ~

Want to share this Link Party? Grab the Code Below!
Too Keep it Fair~No Anonymous Voting~Thanks for understanding!

MckMama gives Financial Advice

No, really.
Next Your Family Live! Webcast
April 21, 2010: Family Finances
Guests: Jill Savage; Jonni McCoy
2:00 - 3:00 p.m. (EDT)

Guests Jill Savage, Jennifer McKMama McKinney and Jonni McCoy will be sharing money-saving tips, and other ideas to help you spend more time focusing on your family and less time focused on the finances. How do you make ends meet at your house? Talk to us about your family, ask a question or pass along your favorite cost-cutting tips when you join us for Your Family Live!.

It's no secret that for many families, one of the biggest pressure points is the topic of family finances (or lack of them)! Many families find themselves with more month than money. But instead of getting stressed out about money, it's time to study how to successfully steward it. Quit "charging it" and take charge of your family's finances!

Tune in and learn how you, too, can foreclose on two homes and have one of the most expensive SUVs available repossessed, only to buy a more expensive home and another expensive SUV (and subsequent cars) a year later!

Sunday, April 18, 2010

♥ Guest Blogger ♥

Are you ready for a really fun Tutorial for kids! Well, this guest blogger has a great one!!! I can't wait to make these with my kids and proudly display them in my house.
Photobucket
Kalleen from Second Street is here to share Mod Podged Hand Trees. They are amazing. Make sure to stop by her blog for many more amazing ideas and crafts. She is a very talented "Momma"


About MeHi Everyone, My name is Kalleen from "At Second Street". I'm a mother of four who loves to create and design for my family and home. I grew up in a super creative family with parents who taught me from a young age the joy that comes with creating. I want my own kids to feel that joy and have tried to encourage them to make things themselves. This is my favorite kids craft we've made together, and I hope you and your kids enjoy making them too.


"Mod Podged Hand Trees"

I have to be honest. I love my kids. I love crafts. But I hate kid's crafts. The thing that I hate about them is that five minutes after they have created something, I want to throw it away. I just don't like the clutter.


I knew I had to come up with something I would treasure instead of trash. My kids and I created these beautiful hand trees.
They are personalized with trunks made from their arm and hand. I really enjoyed spending one on one time with each kid as we put these together.
Mod Podge is the perfect medium for kids crafts. You can't mess it up. Since it dries clear you can't see all the mistakes and spills. My kids kept commenting on how much the loved "painting".
What I used:
-Wood Picture Boards -I got mine at Tai Pan Trading Co., they were damaged and 75% off. You could also use a canvas.
- burlap
-scrap fabric
-scissors
- Mod Podge- I used matte, but I think anything you have is fine.
-Permanent marker - to sign name at the end

These are the boards I used. I needed more surface area so I used the back side as my front.
Some of the Fabrics I used: I liked using a heavier fabric, but anything would work. Make sure you have lots of variety. You want the fabrics to work together while still having as many different colors as possible. You don't want all the fabrics to blend together. I used eight different fabrics.
Here is how we made them:
Step 1: I removed the hanger and stickers from the back of my board. I saved the hanger and placed it on the other side when it was time to hang my pictures.
Step 2: I covered the entire board with Mod Podge and layed a piece of burlap, bigger than the board, over the top. Then I used my sharp sewing scissors to cut away the excess burlap till it was straight and flush with the board. If you are using a canvas I would try wrapping the canvas and stapling it to the back instead.
Step 3: Cutting the leaves and hands out. I did all the cutting. I didn't trust my kids with my sharp sewing scissors. I was afraid someone would lose a finger. If your kids are older you might want to let them do this part.

I cut three different sizes of leaves for each pattern.
Tracing and cutting the hands before starting with the Mod Podge, make things easier when everything is covered with goo.
Step 4: Glue everything down.
I helped glue the first four leaves down so my kids had an idea of which direction the leaves should go. Then they took over. They painted the Mod Podge onto the backs of the leaves then placed them were they wanted. I reminded them to cover all the empty spots and to use all the different colors.
Step 5: Once all your leaves are on. They plastered the back of the trunk with Mod Podge and placed it on the picture with the hand in the center of the leaves. You might need to trim some of the trunk so that it is flush with the bottom of the board.
Now they can finish it off by painting over the entire tree with the Mod Podge. It dries clear so don't worry if it looks a little messy.
The leaves dry stiff and look cute if they start to come off the board.
Worthy of being hung in a prominent place my kids are more than happy to show off their handy work. Each tree is different just like my kids.

Thanks you Kalleen for such an amazing tutorial & project to do with kids. I love it. 
Make sure you all stop by and tell her how terrific she is and check out all her fabulous posts!
Grab her button too!

~ What our Readers are Making ~
Thanks for sharing
Look at What "The Cottage Momma" Made!


Crescent Moon, 17 April 2010

crescent moon from 17 April 2010

Taking photos of the Moon is becoming at obsession! This is the best of about 10 shots I took last night. I used the tripod and self-timer, f/5.8, ISO-64, exposure time 0.25 secs, exposure bias -2, max aperture 3.44. :-)

Search This Blog

Followers