Pages

Showing posts with label Hair Accessories. Show all posts

Thursday, July 7, 2011

6 Strand Braid Tutorial

I've been braiding my girls hair for years. All sorts. I love doing their hair. Family, friends and even strangers have asked, "Why don't you write a book?" I have thought about it. I have pictures of all their hairdo's, just not steps of how to do them. Maybe one day. 

But to get to todays post. BRAIDS! This particular braid has 6 strands. There are two types of braids you can do with 6 strands. This is one of them.

Start by picking out your string, yarn, raffia, hair. I would say the easiest would be to start learning on the bead string. I got mine (below) from our local craft store in the kids craft section.
Step 1...Put all six strands together. Use a small rubber band to hold them together.
I braided this down a bit so you could get a better image of what I was doing. I also used 6 colors so you could easily pick out what I was trying to show you
Step 2...Your strands should look like this.
Step 3...Start on the far left red strand. Go under the orange.
Step 4...Now take the red strand and go over the top of the yellow.
Step 5...Starting on the right now, take the blue strand, go over the top of the purple.
Step 6...Again with the blue, go under the green strand.
Step 7...With the blue, go over the top of the red.
Step 8...Tighten all strands and repeat until desired length is achieved.
Tip...an easy way to remember this.
From the left...Under, Over
From the right...Over, Under, Over
Repeat!

This will be your finished look
You can used this for a number of things...bracelets, hair accessory, belts, bookmarks and more. 
I love braiding and even have my girls learning already. My oldest is up to the 5 strand. She loves it too. We are both teaching the younger two on the 3 and 4 strands now.
What do you think?

Friday, January 7, 2011

Fleece Hair Ties

Here is a quick and easy project for you. 
Fleece Hair Ties


Choose your favorite fleece fabrics and start cutting. 
Cut each piece to 1-1/2 x 7 inches long.

I use these in a variety of colors for my girls. I love to add them to their pony tails. They look really cute when  you add a bunch. I need to post some pics of them in use. LOL

Not only that, I also love to use these to curl their hair.

Yep! All I do is.... when their hair is wet I take piece by piece, fold over the end of the hair and then roll it up to the top of the head, tie a knot and leave it in over night. The next morning you have beautiful curls.

The girls really like these vs. the sponge curlers. They always complained that the hard plastic hurt their heads and made it uncomfortable to sleep. Plus the hair can sometimes get tangled in it and pull out some hairs.

The bonus with the fleece is there is nothing hard to lay on, all soft. And nothing to get tangled in.

Fleece also comes in a variety of colors and patterns too. So you will find a favorite for every girl you know. 

These are fun to give in sets of 25 and so so cute in piggy tails!!!


Monday, May 17, 2010

Hair Accessory Frame Tutorial

I made this adorable Hair Accessory Frame for a good friend on mine. She just had her baby this week. Congrats Jenn! I will be delivering it soon.
What you will need...
  • Frame (whatever size you like, but larger is best for space)
  • Can of spray paint ~ I chose this color to match the lil ones room
  • Blocks (in this case I used pipe let over from hubby's job)
  • Sand Paper (Fine)
  • Scrap Fabric (large enough to cover the inner frame)
  • Blanket Batting (a little smaller than your fabric)
  • Staple Gun
  • Buttons
  • E6000 or Hot Glue Gun
  • Paint Pen (colors of your choosing)
  • Embellishments
How to make this...

First,  take the back off your frame. Place the frame on your blocks (these pipes came in handy, so if you have them, use those instead). This makes it easier to do your painting in 1 step. You can get all the outside and inside sides easily too!
Grab your spray paint and start spraying away. With this particular frame I wasn't worried about covering it completely. You'll see why in a second.
Once dry, take a fine piece of sand paper. Lightly sand the edges and sides. Rough it up a bit! I like the worn look. If you don't, you can skip this part. See below how cool it looks. LOL
Now your ready to go indoors and have some fun decorating. Take your blanket batting and cut to fit the inside of the frame opening, set aside for now.
Now take your fabric scrap and cut it to the size of the whole frame. You want it larger so you can fold it over and attach it to the back. But don't do that just yet. We need to add ribbons. Make sure you place the fabric over the batting. The batting is to give it a little extra lift and softness to the board.
It's time to lay out your ribbons. I used a variety of ribbons so I could give it a lot of color. Make sure you line it all out how you want them because your next step will be tacking them down.
Carefully turn over the frame so it is face down. You don't want your ribbons to fall out of place. Now grab that staple gun and tack down your fabric, making sure you get all the ribbons too! Trim excess fabric and ribbon. Don't worry about how ugly it looks, you can cover the back with a trim piece. I like to cover the whole thing. Once these are made, you won't take them apart anyway!
Now you want to use either a Hot Glue Gun or E6000 (I used E6000) and glue the ribbon to the fabric. You only want to glue the ribbons where they meet. See where the tip of the glue cap is. Glue those two ribbons down.
Now you get to pick some cute buttons to glue on top of the spots you just glued. You can use large, small and shaped buttons.
Finally, just embellish your frame with paint pens, flowers, a name, ect. I used scrabble pieces for her name and some newspaper flowers that I had made recently. Don't forget to cover the back of your frame with a large, thin piece of wood. Just tack or glue in place. Add a wall hanger and you are ready to hang and keep some cute hair accessories.
I think this turned out very cute!
I'd love to see your pictures, if you have made one of these! Send them our way and we will link them up to this post!


Sunday, May 16, 2010

FLexi8 Review


The Flexi 8 is a completely unique, flexible barrette that holds thick, thin, curly, straight, fine and coarse hair. The Flexi 8 comes in a variety of sizes and hundreds of ever changing styles. Flexi 8 uses an ingenious patented locking mechanism to secure it in your hair. It’s such an attractive and unique accessory for your hair, once you try the Flexi 8, LOOK OUT! (you’re in love)
★ I was so happy to get to review Flexi 8 because I already owned one. My husband and I took the kids to San Francisco for a family outing. We always go the the Pier and walk around. We saw this interesting cart selling hair accessories.
I stood back and watched as the man showed other women how his product worked. I was amazed. Elbowed my husband and said, “Come on, I am getting one of those!”. He laughed. I have had it for a while now and have been wanting to get more when I was offered this review. YEAH! I received 5 beautiful Flexi 8’s for review. Woo! Hoo! As soon as I got them, I tried all sorts of different styles with my hair as well as my daughters hair. They are great for kids too! Originally, I only had 1 size that worked great for a pony tail or bun style, but now I can do anything. If you buy one, you definitely have to get more than one and maybe 2 in the same size too! Can you tell how much I love these? These are the best flexible hair accessories around. You have to have one! ★

Flexi 8 is getting amazing feedback!
Bought 5 clips this a.m.-for me & for gifts. Within hours a friend admired the clip in my hair. She was so impressed, she left to buy one. (Blodwen Tar – US)
Got 3 of these at a crafts fair in Garland, TX on the 4th of July and I LOVE THEM! The best hair product I have ever purchased, hands down. (Kim Reist – US)
These suckers hold like a rock with no pulling or poking.. They’re great! I will definitely be purchasing more in the future :D (Arica)
I went to San Francisco last weekend and saw the booth for the hair clips getting set up. I have curly,thick,long hair and being by the water made it frizzy. So I walked over to the booth and watched a man put a lady’s hair up in seconds and it looked so cute. Tried it in mine and it worked wonderfully!! No more hair ties, plastic clips that don’t last!! I was the very first sale at that booth in Frisco and now I want all the sizes!! (Renee)
Things that I love....
  • They come in 6 different sizes.
  • Works for all hair types. Long, Short, Thin, Thick
  • Great prices. Starting at only $10
  • Designs for simple where or a night out. Great for formal occasions too!
  • Very Attractive and Quality material used
  • Learn different hair styles by watching their quick videos
  • Easy way to choose how to buy ~ Check out their sizing guide and sizing video
  • Get ready quickly with a quick up do’ using the Flexi 8
  • A great “GIFT” item too!
  • Check out their great customer reviews

Ornate & Beautiful VS Plastic & “cheap looking
Doesn’t give you a headache 
VS Often causes headachesDesigned to bend and flex VS Breaks routinely
Flexi-8© is Unique 
VS Claw clip is everywhere
Keep in Mind When Ordering
Almost all women over-estimate what size they need so be sure to check out theirsizing video to help you choose the right size for you. I also recommend that you buy more that one in size and color to go with different occasions.
The featured product {s} in this post were provided to me free of charge by the manufacturer or pr company representing the company. All opinions expressed in this review are my own and not influenced in any way by anyone.  Trendy Treehouse Disclaimer/Terms of use.

Thursday, April 22, 2010

Balloon Barrette Tutorial & Book Review


Before we get started with this post I wanted to invite you all to add a photo to our current "Shutter Love Tuesday" Link Party. The theme is "Balloons" Tomorrow we will be posting the TOP 10 Photos and 1 Viewer Choice. 
So get your photo entered soon! We need more entries. Thanks!

Now, Gather up some supplies for some fun new barrettes.  I found a wonderful book online. And as you already know, I am addicted to buying Craft books. Yes, I had to buy it!  

~Hair Bows for Kids~
A fun book that offers so many fun ways to make hair bows and barrettes out of things you wouldn't even think of. Some of the items she uses, is shoe laces, balloons, buttons, vinyl (yes I did write vinyl) and even food items. Too cute. You have to get this book. You can buy it HERE

Balloon Barrettes
Today I am going to share with you a tutorial about the balloon barrettes.

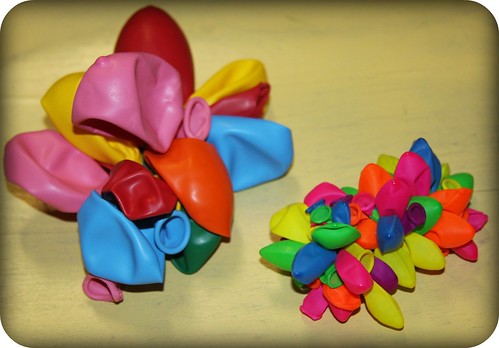
Aren't they cute! I can't wait to make various versions of these. I have so much in mind!


We'll start with the 
Large Balloon Barrette

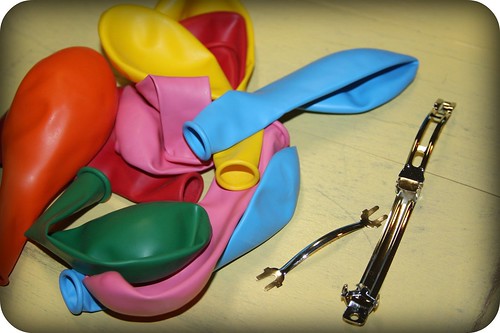
What you will need....
  • Large Balloons (about 10) in various colors
  • Large Barrette
How to make them...
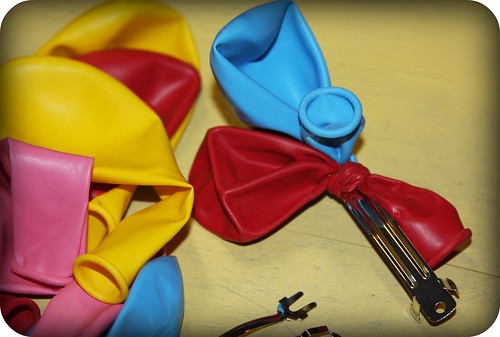
First, remove the back metal pieces from the barrette. Take one balloon (add just a bit of air) and tie it to the barrette. Continue tying the balloons on in alternate directions until you used all 10 balloons.

This is what the barrette should look like on the back. Keep the knots on the top side so it doesn't interfere with the barrettes metal back pieces. 
Place the two metal pieces back on the barrette. And that's it your done. It is that simple.
Look at how cute it looks in hair.
Small Balloon Barrette

What you will need...
  • Small Balloons (30) in various colors
  • Large Barrette
  • 6 1/8" ribbons cut to 6" each (any color will do, they aren't going to show.
How to make them...
Again, remove the back pieces off the barrette and set aside.  Start by taking 1 ribbon and tying 6 small balloons (filled with a bit of air) to the center. Continue making 6 clusters of these.
Now you have the finished clusters. It's time to add them to the barrette.
Double knot each cluster onto the barrette. Trim excess ribbons. You can always use a little glue to the knots also to keep them from coming undone. I did. 
Add on your barrette pieces and done. Another fun and easy balloon barrette.

I love this one because it has so many balloons. It just looks so cute.
Balloon Hair Clip

Fun Ideas for these....
  • Make them for the Birthday Girl
  • Give them as party favors at a birthday party
  • Add curling ribbons or netting for a special look
  • Make a variety of colors (rainbows or choose 2 or 3 colors
  • Make them all in one color and splatter with paint. These are in the book too! They are adorable.
  • Try adding 3 small balloon ribbon clusters to a clip for younger girls
  • They would make fun gifts too!
  • There is so much you can do with them. Have Fun!
While many reviews are created as a result of receiving a complimentary product, the following content was provided by Trendy Treehouse because it is a product that we believe in and purchase regularly. The item reviewed was  purchased on our own and was not compensated in any way for a review. Disclaimer/Terms of use.

Search This Blog

Followers